
Wednesday, August 20, 2014

Identify PCI and USB Wired and Wireless Driver in Linux - Identify PCI Driver. Ubuntu, Debian, Mint, CentOS, Fedora & all Linux distro

Read full details here: Identify PCI and USB Wired and Wireless Driver in Linux - Identify PCI Driver. Ubuntu, Debian, Mint, CentOS, Fedora & all Linux distro

This guide shows how you can identify PCI Driver Chipset Information on Linux. Often users troll different forums and blogs to find out they can identify which driver their PCI or USB device is using. This guide applies to all possible scenarios. After reading and following this guide you will be able to identify the followings:

Examples of PCI devices

  1. Identify PCI driver for Processor – CPU
  2. Identify PCI driver for Motherboards
  3. Identify PCI driver for Communication controllers
  4. Identify PCI driver for Network devices
  5. Identify PCI driver for USB devices
  6. Identify PCI driver for USB controllers
  7. Identify PCI driver for High Definition Audio Controller
  8. Identify PCI driver for VGA or graphics cards
  9. Identify PCI driver for Memory (RAM)
  10. Identify PCI driver for Thermal Control Registers
  11. Identify PCI driver for Ethernet devices
  12. Identify PCI driver for DVD R/W devices
  13. Identify PCI driver for Blueray devices
  14. Identify PCI driver for CDROM devices
In short, any device drivers can be identified that is using plugged into a PCI slot.

This guide will work for any Linux distributions, namely -
  1. Linux Mint
  2. Ubuntu
  3. Debian GNU/Linux
  4. Mageia / Mandriva
  5. Fedora
  6. openSUSE / SUSE Linux Enterprise
  7. Arch Linux
  8. CentOS / Red Hat Enterprise Linux
  9. PCLinuxOS
  10. Slackware Linux
  11. Puppy Linux
  12. Kali Linux (my distro ;) )
As usual, I will start with basics first. next few paragraphs are slightly boring but if you really want to understand, you might as well read them, otherwise just skip to the technical bits. Table of contents above.
So let’s start with the basics .. what is a PCI device…

What is Peripheral Component Interconnect or PCI?

Conventional PCI, often shortened to PCI, is a local computer bus for attaching hardware devices in a computer. PCI is an initialism of Peripheral Component Interconnect and is part of the PCI Local Bus standard. The PCI bus supports the functions found on a processor bus but in a standardized format that is independent of any particular processor’s native bus. Devices connected to the PCI bus appear to a bus master to be connected directly to its own bus and are assigned addresses in the processor’s address space.It is a parallel bus, synchronous to a single bus clock.

Attached devices can take either the form of an integrated circuit fitted onto the motherboard itself (called a planar device in the PCI specification) or an expansion card that fits into a slot. The PCI Local Bus was first implemented in IBM PC compatibles, where it displaced the combination of several slow ISA slots and one fast VESA Local Bus slot as the bus configuration. It has subsequently been adopted for other computer types. Typical PCI cards used in PCs include: network cards, sound cards, modems, extra ports such as USB or serial, TV tuner cards and disk controllers. PCI video cards replaced ISA and VESA cards until growing bandwidth requirements outgrew the capabilities of PCI. The preferred interface for video cards then became AGP, itself a superset of conventional PCI, before giving way to PCI Express.

The first version of conventional PCI found in consumer desktop computers was a 32-bit bus using a 33 MHz bus clock and 5 V signalling, although the PCI 1.0 standard provided for a 64-bit variant as well. These have one locating notch in the card. Version 2.0 of the PCI standard introduced 3.3 V slots, physically distinguished by a flipped physical connector to preventing accidental insertion of 5 V cards. Universal cards, which can operate on either voltage, have two notches. Version 2.1 of the PCI standard introduced optional 66 MHz operation. A server-oriented variant of conventional PCI, called PCI-X (PCI Extended) operated at frequencies up to 133 MHz for PCI-X 1.0 and up to 533 MHz for PCI-X 2.0. An internal connector for laptop cards, called Mini PCI, was introduced in version 2.2 of the PCI specification. The PCI bus was also adopted for an external laptop connector standard—the CardBus. The first PCI specification was developed by Intel, but subsequent development of the standard became the responsibility of the PCI Special Interest Group (PCI-SIG).

Conventional PCI and PCI-X are sometimes called Parallel PCI in order to distinguish them technologically from their more recent successor PCI Express, which adopted a serial, lane-based architecture. Conventional PCI’s heyday in the desktop computer market was approximately the decade 1995-2005. PCI and PCI-X have become obsolete for most purposes, however, they are still common on modern desktops for the purposes of backwards compatibility and the low relative cost to produce. Many kinds of devices previously available on PCI expansion cards are now commonly integrated onto motherboards or available in universal serial bus and PCI Express versions. Source: Wikipedia

Question: How do I identify PCI driver for anything in Linux?

This is a million dollar question, just how often you see a similar post in forums and blogs with vague and unreliable answers? I will try my best to answer anything and everything in this post about all devices and their drivers in here. So, stay tuned as this is going to a long a** post.

Identify PCI Driver Chipset Information in Linux

lspci which is a standard command in all Linux distribution will show you the PCI devices on your system.

LS = List
PCI = Peripheral Component Interconnect devices

Step 1: List all PCI devices – Identify PCI driver

root@kali:~# lspci
 
This will give you a sample output like the following:

root@kali:~# lspci
(some output removed)
00:00.0 Host bridge: Intel Corporation Core Processor DMI (rev 11)
00:03.0 PCI bridge: Intel Corporation Core Processor PCI Express Root Port 1 (rev 11)
00:19.0 Ethernet controller: Intel Corporation 82578DM Gigabit Network Connection (rev 06)
00:1e.0 PCI bridge: Intel Corporation 82801 PCI Bridge (rev a6)
00:1f.0 ISA bridge: Intel Corporation 5 Series Chipset LPC Interface Controller (rev 06)
00:1f.3 SMBus: Intel Corporation 5 Series/3400 Series Chipset SMBus Controller (rev 06)
01:00.0 VGA compatible controller: NVIDIA Corporation GT218 [GeForce 210] (rev a2)
root@kali:~#
 
Now you can see the device names, types and some funky numbers at the front. (highlighted in bold-red).

Step 2: Get verbose output for selected device – Identify PCI driver

Let’s say we want to identify the driver used my Linux kernel for Ethernet controller (which is the wired port on my motherboard).
00:19.0 Ethernet controller: Intel Corporation 82578DM Gigabit Network Connection (rev 06)
Copy the number’s at the front i.e. 00:19.0 and use it with lspci command to find more info

root@kali:~# lspci -vv -s 00:19.0
This will give you an output like below:
root@kali:~# lspci -vv -s 00:19.0
00:19.0 Ethernet controller: Intel Corporation 82578DM Gigabit Network Connection (rev 06)
    Subsystem: Acer Incorporated [ALI] Device 8000
    Control: I/O+ Mem+ BusMaster+ SpecCycle- MemWINV- VGASnoop- ParErr- Stepping- SERR- FastB2B- DisINTx+
    Status: Cap+ 66MHz- UDF- FastB2B- ParErr- DEVSEL=fast >TAbort- <TAbort- <MAbort- >SERR- <PERR- INTx-
    Latency: 0
    Interrupt: pin A routed to IRQ 46
    Region 0: Memory at faec0000 (32-bit, non-prefetchable) [size=128K]
    Region 1: Memory at faefa000 (32-bit, non-prefetchable) [size=4K]
    Region 2: I/O ports at d000 [size=32]
    Capabilities: [c8] Power Management version 2
        Flags: PMEClk- DSI+ D1- D2- AuxCurrent=0mA PME(D0+,D1-,D2-,D3hot+,D3cold+)
        Status: D0 NoSoftRst- PME-Enable- DSel=0 DScale=1 PME-
    Capabilities: [d0] MSI: Enable+ Count=1/1 Maskable- 64bit+
        Address: 00000000fee0f00c  Data: 4192
    Capabilities: [e0] PCI Advanced Features
        AFCap: TP+ FLR+
        AFCtrl: FLR-
        AFStatus: TP-
    Kernel driver in use: e1000e

So the Kernel is using a driver named e1000e.
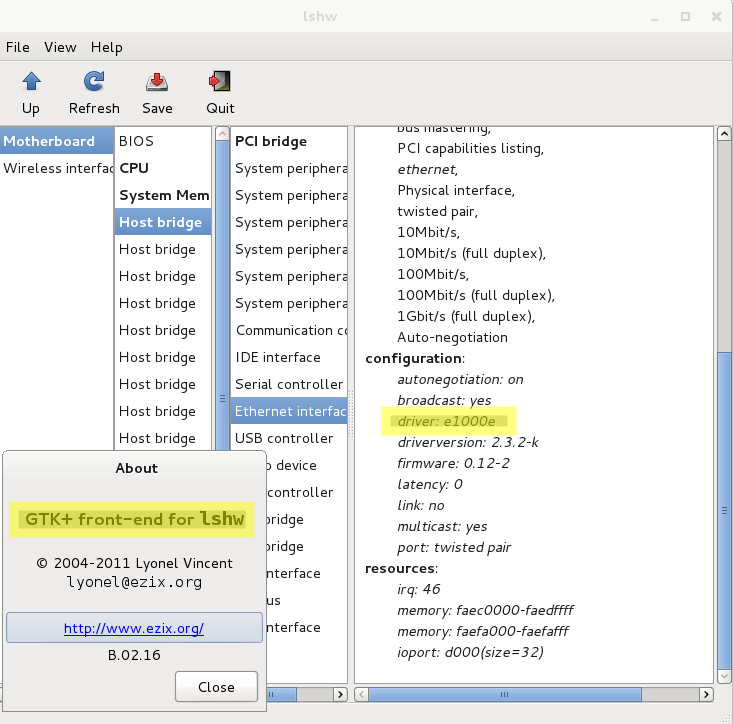


Read the rest of it here: Identify PCI and USB Wired and Wireless Driver in Linux - Identify PCI Driver. Ubuntu, Debian, Mint, CentOS, Fedora & all Linux distro

How to find files containing specific text in Linux? Ubuntu, Debian, Mint, CentOS, Fedora and any Linux distro

Read full details here: How to find files containing specific text in Linux? Ubuntu, Debian, Mint, CentOS, Fedora and any Linux distro


Very often new users would dwell on Google trying to find the correct command to find files containing specific text. This is particularly important when you’re tying to follow a badly written guide of forum post that says something like replace 0 with 1 in this line which will fix PulseAudio configured for per-user sessions … (warning)

PULSEAUDIO_SYSTEM_START=0
 
Now for an experienced user, no problem, you know exactly where to find a configuration file for PulseAudio. For a new Linux user, yeah tell me about it. I’ve been there when I started with Slackware back late nineties.
This guide shows a bunch of commands that you can use  to find files containing specific text in Linux, namely Ubuntu, Debian, Mint, CentOS, Fedora and any Linux distro.
This guide will work for any Linux distributions, namely -
  1. Linux Mint
  2. Ubuntu
  3. Debian GNU/Linux
  4. Mageia / Mandriva
  5. Fedora
  6. openSUSE / SUSE Linux Enterprise
  7. Arch Linux
  8. CentOS / Red Hat Enterprise Linux
  9. PCLinuxOS
  10. Slackware Linux
  11. Puppy Linux
  12. Kali Linux (my distro ;) )


Find files containing specific text using grep command

grep is a command-line utility for searching plain-text data sets for lines matching a regular expression. Grep was originally developed for the Unix operating system, but is available today for all Unix-like systems. Its name comes from the ed command g/re/p (globally search a regular expression and print), which has the same effect: doing a global search with the regular expression and printing all matching lines.
To find files containing specific text, you are possibly better off using the grep command. The grep command can find and search a specific text from all files quickly.

grep command syntax

Syntax for grep command is simple:
grep "text string to search” directory-path
OR
grep [option] "text string to search” directory-path
OR
grep -r "text string to search” directory-path
OR
grep -r -H "text string to search” directory-path
OR
egrep -R "word-1|word-2” directory-path
OR
egrep -w -R "word-1|word-2” directory-path

Find files containing specific text using grep command examples

In this example, we will search for 'PULSEAUDIO_SYSTEM_START‘ in all configuration files located in /etc directory.
Now there’s a small problem, depending on your Linux, BSD or Unix distro, Find command can be slightly different (in terms of Syntaxes). So I will outline all possible combinations, you can just try one at a time to determine which one best suites you.

Find files containing specific text when you know the location

If you know the exact location and directory you’re after, then use
root@kali:~# grep "PULSEAUDIO_SYSTEM_START" /etc/default/pulseaudio 
PULSEAUDIO_SYSTEM_START=1
root@kali:~#


Read the rest of it here: How to find files containing specific text in Linux? Ubuntu, Debian, Mint, CentOS, Fedora and any Linux distro

Monday, August 18, 2014

Cracking WPA2 WPA with Hashcat in Kali Linux (BruteForce MASK based attack on Wifi passwords)

Read full details here: Cracking WPA2 WPA with Hashcat in Kali Linux (BruteForce MASK based attack on Wifi passwords)

  cracking-wpa-wpa2-with-oclhashcat-cudahashcat-or-hashcat-on-kali-linux-bruteforce-mask-based-attack-blackmore-ops-6
cudaHashcat or oclHashcat or Hashcat on Kali Linux got built-in capabilities to attack and decrypt or Cracking WPA2 WPA with Hashcat - handshake .cap files. Only constraint is, you need to convert a .cap file to a .hccap file format. This is rather easy.

Hashcat

Hashcat is the self-proclaimed world’s fastest CPU-based password recovery tool. It is available free of charge, although it has a proprietary codebase. Versions are available for Linux, OSX, and Windows and can come in CPU-based or GPU-based variants. Hashcat currently supports a large range of hashing algorithms, including: Microsoft LM Hashes, MD4, MD5, SHA-family, Unix Crypt formats, MySQL, Cisco PIX, and many others. Hashcat has made its way into the news many times for the optimizations and flaws discovered by its creator, which become exploited in subsequent hashcat releases. (For example, the flaw in 1Password's hashing scheme.)

Attack types

Hashcat offers multiple attack modes for obtaining effective and complex coverage over a hash's keyspace. These modes are:
  • Brute-Force attack
  • Combinator attack
  • Dictionary attack
  • Fingerprint attack
  • Hybrid attack
  • Mask attack
  • Permutation attack
  • Rule-based attack
  • Table-Lookup attack
  • Toggle-Case attack
The traditional bruteforce attack is considered outdated, and the Hashcat core team recommends the Mask-Attack as a full replacement.

Variants

Hashcat comes in two main variants:
  • Hashcat - A CPU-based password recovery tool
  • oclHashcat - A GPU-accelerated tool
Many of the algorithms supported by Hashcat can be cracked in a shorter time by using the well-documented GPU-acceleration leveraged in oclHashcat (such as MD5, SHA1, and others). However, not all algorithms can be accelerated by leveraging GPUs. Bcrypt is a good example of this. Due to factors such as data dependant branching, serialization, and Memory (to name just a few), oclHashcat is not a catchall replacement for Hashcat. Hashcat is available for Linux, OSX and Windows. oclHashcat is only available for Linux and Windows due to improper implementations in OpenCL on OSX
Important Note: Many users try to capture with network cards that are not supported. You should purchase a card that supports Kali Linux including injection and monitor mode etc. A list can be found in 802.11 Recommended USB Wireless Cards for Kali Linux. It is very important that you have a supported card, otherwise you'll be just wasting time and effort on something that just won't do the job.

My Setup

I have a NVIDIA GTX 210 Graphics card in my machine running Kali Linux 1.0.6 and will use rockyou dictionary for most of the exercise. In this post, I will show step on Cracking WPA2 WPA with Hashcat (handshake files) (.cap files) with cudaHashcat or oclHashcat or Hashcat on Kali Linux. I will use cudahashcat command because I am using a NVIDIA GPU. If you’re using AMD GPU, then I guess you’ll be using oclHashcat. Let me know if this assumptions is incorrect. To enable GPU Cracking, you need to install either CUDA for NVIDIA or AMDAPPSDK for AMD graphics cards. I've covered those in in my previous posts.

NVIDIA Users:

  1. Install proprietary NVIDIA driver on Kali Linux – NVIDIA Accelerated Linux Graphics Driver
  2. Install NVIDIA driver kernel Module CUDA and Pyrit on Kali Linux – CUDA, Pyrit and Cpyrit-cuda

AMD Users:

  1. Install AMD ATI proprietary fglrx driver in Kali Linux 1.0.6
  2. Install AMD APP SDK in Kali Linux
  3. Install Pyrit in Kali Linux
  4. Install CAL++ in Kali Linux
 

Why use Hashcat for cracking WPA WPA2 handshake file?

Pyrit is the fastest when it comes to cracking WPA2 WPA handshake files. So why are we using Hashcat to crack WPA2 WPA handshake files?
  1. Because we can?
  2. Because Hashcat allows us to use customized attacks with predefined rules and Masks.
Now this doesn't explain much and reading HASHCAT Wiki will take forever to explain on how to do it. I'll just give some examples to clear it up. Hashcat allows you to use the following built-in charsets to attack a WPA2 WPA handshake file.

Built-in charsets

?l = abcdefghijklmnopqrstuvwxyz
?u = ABCDEFGHIJKLMNOPQRSTUVWXYZ
?d = 0123456789
?s = !”#$%&'()*+,-./:;⇔?@[\]^_`{|}~
?a = ?l?u?d?s

Numbered passwords

So lets say you password is 12345678. You can use a custom MASK like ?d?d?d?d?d?d?d?d What it means is that you're trying to break a 8 digit number password like 12345678 or 23456789 or 01567891.. You get the idea.

Letter passwords - All uppercase

If your password is all letters in CAPS such as: ABCFEFGH or LKHJHIOP or ZBTGYHQS ..etc. then you can use the following MASK:

?u?u?u?u?u?u?u?u
 
It will crack all 8 Letter passwords in CAPS.

Letter passwords - All lowercase

If your password is all letters in lowercase such as: abcdefgh or dfghpoiu or bnmiopty..etc. then you can use the following MASK:

?l?l?l?l?l?l?l?l
 
It will crack all 8 Letter passwords in lowercase. I hope you now know where I am getting at.

Passwords - Lowercase letters and numbers

If you know your password is similar to this: a1b2c3d4 or p9o8i7u6 or n4j2k5l6 ...etc. then you can use the following MASK:

?l?d?l?d?l?d?l?d

Passwords - Uppercase letters and numbers

If you know your password is similar to this: A1B2C3D4 or P9O8I7U6 or N4J2K5L6 ...etc. then you can use the following MASK:

?u?d?u?d?u?d?u?d

Passwords - Mixed matched with uppercase, lowercase, number and special characters.

If you password is all random, then you can just use a MASK like the following:

?a?a?a?a?a?a?a?a
 
Note: ?a represents anything .... I hope you're getting the idea.

Read the rest of it here: Cracking WPA2 WPA with Hashcat in Kali Linux (BruteForce MASK based attack on Wifi passwords)

Practical Examples of Linux Find Command, Find Command Examples for Ubuntu, Mint, Debian, CentOS, Fedora and all Linux distributions

Read full details here: Practical Examples of Linux Find Command, Find Command Examples for Ubuntu, Mint, Debian, CentOS, Fedora and all Linux distributions
In Unix-like and some other operating systems, find is a command-line utility (Find Command Examples here) can be used to search through one or more directory trees of a file system, locates files based on some user-specified criteria and applies a user-specified action on each matched file. The possible search criteria include a pattern to match against the file name or a time range to match against the modification time or access time of the file. By default, find returns a list of all files below the current working directory.
The related locate programs use a database of indexed files obtained through find (updated at regular intervals, typically by cron job) to provide a faster method of searching the entire filesystem for files by name.


Contents [hide]


Read the rest of it here: Practical Examples of Linux Find Command, Find Command Examples for Ubuntu, Mint, Debian, CentOS, Fedora and all Linux distributions

Thursday, August 14, 2014

Cracking MD5, phpBB, MySQL and SHA1 passwords with Hashcat on Kali Linux

Read full details here: Cracking MD5, phpBB, MySQL and SHA1 passwords with Hashcat on Kali Linux

Hashcat or cudaHashcat is the self-proclaimed world’s fastest CPU-based password recovery tool. Versions are available for Linux, OSX, and Windows and can come in CPU-based or GPU-based variants. Hashcat or cudaHashcat currently supports a large range of hashing algorithms, including: Microsoft LM Hashes, MD4, MD5, SHA-family, Unix Crypt formats, MySQL, Cisco PIX, and many others.

Hashcat or cudaHashcat comes in two main variants:
  1. Hashcat – A CPU-based password recovery tool
  2. oclHashcat or cudaHashcat – A GPU-accelerated tool
Many of the algorithms supported by Hashcat or cudaHashcat can be cracked in a shorter time by using the well-documented GPU-acceleration leveraged in oclHashcat or cudaHashcat (such as MD5, SHA1, and others). However, not all algorithms can be accelerated by leveraging GPUs.
Hashcat or cudaHashcat is available for Linux, OSX and Windows. oclHashcat or cudaHashcat is only available for Linux and Windows due to improper implementations in OpenCL on OSX.


My Setup

My setup is simple. I have a NVIDIA GTX 210 Graphics card in my machine running Kali Linux 1.0.6 and will use rockyou dictionary for this whole exercise. In this post, I will show How to crack few of the most common hashes
  1. MD5
  2. MD5 – phpBB
  3. MySQL and
  4. SHA1
I will use 2 commands for every hash, hashcat and then cudahashcat. Because I am using a NVIDIA GPU, I get to use cudaHashcat. If you’re using AMD GPU, then I guess you’ll be using oclHashcat. Correct me if I am wrong here!
Before you enable GPU Cracking, I’ve spent last few months writing guides on how to enable those features in Kali Linux.

NVIDIA Users:

  1. Install proprietary NVIDIA driver on Kali Linux – NVIDIA Accelerated Linux Graphics Driver
  2. Install NVIDIA driver kernel Module CUDA and Pyrit on Kali Linux – CUDA, Pyrit and Cpyrit-cuda

AMD Users:

  1. Install AMD ATI proprietary fglrx driver in Kali Linux 1.0.6
  2. Install AMD APP SDK in Kali Linux
  3. Install Pyrit in Kali Linux
  4. Install CAL++ in Kali Linux
AMD is currently much faster in terms of GPU cracking, but then again it really depends on your card.
You can generate more hashes or collect them and attempt to crack them. Becuase I am using a dictionary, (it’s just 135MB), I am limited to selection number of passwords. The bigger your dictionary is, the more you’ll have success cracking an unknown hash. There are other ways to cracking them without using Dictionary (such as RainBow Tables etc.). I will try to cover and explain as much I can. Advanced users, I’m sure you already know these, so I would appreciate constructive comments. As always, read the manual and help file before you ask for help. Most of the things are covered in manuals and wiki available in www.hashcat.net.
A big thanks goes to the Hashcat or cudaHashcat Dev team, they are the ones who created and maintained this so well. Cudos!.

Getting hashes:

First of all, we need to get our hashes. You can download hash generator applications, but there’s online sites that will allow you to create them. I will use InsidePro who kindly created a page that allows you create hashes on the fly and it’s publicly available. Visit them and feel free to browse their website to understand more about hashes.
The password I am using is simple: abc123


Read the rest of it here: Cracking MD5, phpBB, MySQL and SHA1 passwords with Hashcat on Kali Linux

Cracking Wifi WPA/WPA2 passwords using pyrit cowpatty in Kali Linux

Read full details here: Cracking Wifi WPA/WPA2 passwords using pyrit cowpatty in Kali Linux


http://www.darkmoreops.com/wp-content/uploads/2014/08/16-Cracking-Wifi-WPAWPA2-passwords-using-pyrit-and-cowpatty-blackMORE-Ops.jpg


Read the rest of it here: Cracking Wifi WPA/WPA2 passwords using pyrit cowpatty in Kali Linux

Tuesday, August 12, 2014

(DOS) Denial-of-Service attack on Windows 2008 R2 server and Windows 7 with Metasploits on Kali Linux

Read full details here:(DOS) Denial-of-Service attack on Windows 2008 R2 server and Windows 7 with Metasploits on Kali Linux
All the hacks using Metasploits talks about Windows XP, Windows 2003 server and older version of Windows which are being phased out slowly. More and more people are using Windows 7 as their Operating System and Windows 2008 R2 server for corporate purposes. The purpose of this guide is to show how you can use a simple smb infinite loop vulnerability to crash and do (DOS) Denial-of-service attack on Windows 2008 R2 server and Windows 7 using Metasploits. I’ve tested this with a Windows 7 fresh install (no patch or service packs) and Windows 2008 R2 (no patch and service packs) and in both cases they stopped responding completely. You don’t even get to click anything. The only way I could get back into Windows is by doing a hard reset (press Power Key and reboot).


Now the main problem is most people plug in their Windows 7 into Internet and update with patches and service packs. But many many organizations just lock down their server which got no Internet connectivity and or stop it from updating as some updates requires a reboot. In production environment, rebooting a critical server might cause service interruption. But the way I understand it, if you don’t have enough time to patch your server and desktops, you are leaving them exposed with vulnerability and leaving them wide open, in other words you’re inviting remote hacks into your vulnerable system.

(DOS) Denial-of-service attack on Windows 2008 R2 server and Windows 7 with Metasploits

In this guide, I will demonstrate how to exploit Windows 7 and perform (DOS) Denial-of-service attack on Windows 2008 R2 server who didn’t apply MS10-006 (Vulnerabilities in SMB Client Could Allow Remote Code Execution (978251) patch. According to Microsoft this affects the following unpatched systems:
  • Microsoft Windows 2000,
  • Windows XP,
  • Windows Server 2003,
  • Windows 7, and
  • Windows Server 2008 R2,
It is rated Important for
  • Windows Vista and
  • Windows Server 2008
WOHAA, that’s like everything except Windows NT, ME, 95 and 3.1!!! So if your target hasn’t patched this long lasting issue maybe they should get a taste of it.
This vulnerability could allow remote code execution if an attacker sent a specially crafted SMB response to a client-initiated SMB request. To exploit these vulnerabilities, an attacker must convince the user to initiate an SMB connection to a malicious SMB server. More technical jargon’s here: MS10-006
In case your target is Windows 2003, you should check (DOS) Denial-of-service attack on Windows 2003 with Metasploits guide. If you have issues starting or want to start Metasploits at system start-up (often a good idea when you’re using it heavily) you might also try to read other guides like start Metasploits framework.
If you’re not familiar with Metasploits you should read the first section from (DOS) Denial-of-service attack on Windows 2003 with Metasploits guide. This is a particularly good one as it explains what Metasploits is and how you can use it efficiently.
Now let’s start with the guide.

Start msfconsole

If you don’t have PostgreSQL and Metasploits running already you need to start it. I suggest you just enable postgresql and Metasploits framework at start-up so that you don’t have to type same commands over and over again. As you can see I am running Kali Linux (v1.0.6) and following is how you run Metasploits from command line.
root@kali:~# service postgresql start
[ ok ] Starting PostgreSQL 9.1 database server: main.
root@kali:~# service metasploits start
[ ok ] Starting Metasploits rpc server: prosvc.
[ ok ] Starting Metasploits web server: thin.
[ ok ] Starting Metasploits worker: worker.


Read the rest of it here:(DOS) Denial-of-Service attack on Windows 2008 R2 server and Windows 7 with Metasploits on Kali Linux